Wine Cube: simple wine bottle storage model
Wine Cube is a simple, configurable OpenSCAD based system for creating passive, minimal, modular, high density wine bottle storage shelving units. Configuration options include simple ways of changing the dimensions, capacity and bottle orientation of each shelving unit. This project grew out of a personal need for such shelving and a desire to learn CAD. It is an ongoing, open source project that I am releasing early as I have judged it to have reached a stage of being minimally interesting. This project may be useful to someone looking for a very simple, inexpensive and utilitarian approach to wine bottle shelving, in their home, in a location where its stark appearance won’t offend, such as a basement or garage area. Its simplicity may also make it a good example project for learning OpenSCAD, as I have tried to keep the code simple, clear and logically organized. This article provides a brief description of Wine Cube, my motivation for creating it, and my reasons for choosing OpenSCAD.

Wine Cube Official Site (ajsmith607.github.io/winecube)
Wine Cube Github Repository (github.com/ajsmith607/winecube)
My Motivation for Creating Wine Cube
Wine Cube is an idea that originated with a personal need for a simple and inexpensive way to store a larger number of wine bottles. I planned to store these bottles in my basement, as it was available space, could handle the weight, has an inherently stable, cool temperature, has naturally limited light infiltration, as well as limited access/traffic.
Immediate implications were that the storage solution could be passive (not temperature controlled) and extremely simple to the point that aesthetics could be largely ignored. This meant that the least effort, the cheapest materials, and the most brutally utilitarian methods could be employed. I quickly settled on 3/4 inch plywood for the structure as it is inexpensive, readily available, easy to work with, and likely able to handle the shelf weight. Heavy tarps or other heavy/opaque material could be easily attached to curtain the structure’s openings to further limit light penetration and to provide additional thermal insulation against temperature fluctuations.
To mitigate the risk of possible flooding in the basement, the common approach of simply placing the structure on cinder blocks seemed adequate, although this obviously limits available vertical space, and further highlights the need to stabilize the structure against tipping forces, implying a broader footprint is needed. For simplicity, I decided that one block should be placed under the center of the structure as well as under each corner, allowing the option that separate, adjacent structures could share blocks.
Additionally, the ceiling of the basement is low at the outset and also has pipes and ducts further limiting the vertical space. Horizontal space is itself limited not only in total area, but by the fact that the space is also occupied by semi-permanent and immovable items like the furnace and water heater, and is divided by immovable vertical supports. So I would need to account for these limitations, optimize available space, and recognize that to accommodate more bottles, I may have to create additional distinct structures rather than building a larger individual structure. So, the structure needed modularity to simplify the planning.
I addressed these challenges in two ways: by designing the shelves to densely store the bottles themselves, which are assumed to be standard 750ml wine bottles, and by arranging the shelves in a cube formation that is accessible from multiple sides so multiple units could be easily built and flexibly arranged. I am planning to store bottles that will not use traditional corks, so they will be stored vertically oriented, another simplifying assumption. Finally, a shelf depth of four bottles seemed a reasonable depth for a shelf of any height, and was mathematically consistent with the space occupied by the bottles.
I then satisfied one other requirement: to learn CAD to design the structure. Learning CAD had long been a goal of mine, and this simple structure, consisting of a small number of wood pieces all arranged at right angles, seemed an ideal project to help introduce me to CAD.
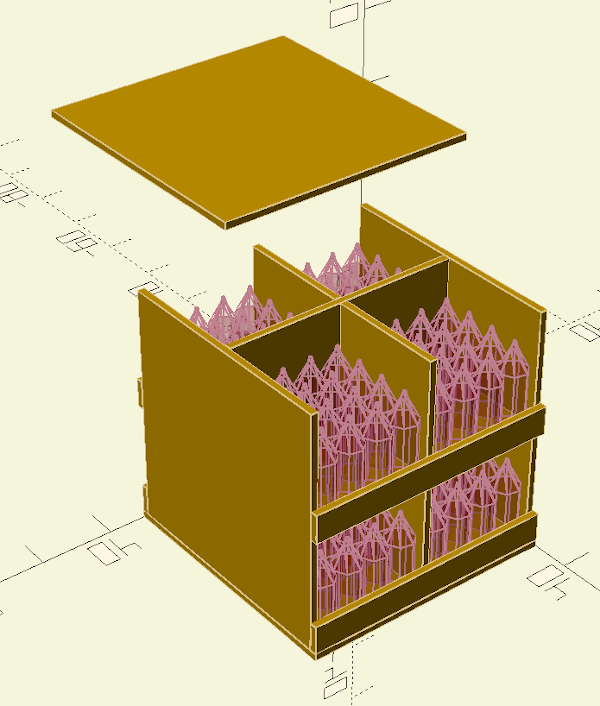
The structure I designed and intended to build is brutally simple, high density, vertically oriented shelving in the shape of a cube with access from two sides to optimize an open space and allow for flexible arrangement of multiple units.
An illustration with the top panel shifted to reveal the structure:
I then began refining the code so that Wine Cube can now be configured to be various dimensions, with both wall and freestanding shelving options and the ability to accommodate either vertical or horizontal bottle orientations, among other options.
The Model
A central assumption of Wine Cube is that standard 750ml wine bottles are being stored, allowing for space optimization by defining a standard space that is constrained as much as possible while remaining adequate, facilitating highly dense storage.
But obviously, there are “standard” bottles of differing styles, with different shapes and slightly different dimensions, and I reviewed the specifications of a number of common bottle variations, such as those shown in the following chart from The Cary Company:

To accommodate the range of likely bottle sizes, I decided the standard bottle space would have a 4 inch diameter footprint. There is greater variability in bottle height, and because bottles are often accessed and manipulated by the bottle neck, I wanted to allow a little extra room to make this more convenient, eventually deciding to make the empty bottle space 16 inches in height. In other words, this additional vertical clearance not only mitigates variations in bottle height, but makes room in the space for a person’s hand to access the bottle, and provides additional room for manipulating the bottle in a densely packed spaced, allowing more room to angle the bottle when it is removed, for example.
By defining the maximum bounding box for this space, it can be translated into rectilinear shelving space. Therefore, the width and depth of the standard wine bottle space is 4x4 inches, or 16 inches square, extending to a height that is also 4x4, or 16 inches. Additionally, my research suggests that a weight of 4 pounds is a reasonable approximate estimated weight for the space, accounting for the 750ml of wine as well its glass container, “cork”, and labelling. These properties define the standard wine bottle space, the fundamental unit of Wine Cube.
The ratio of the dimensions of this space is 1:1:4. This means that if the bottles are arranged in a 4x4 square matrix, the total resulting space is a perfect cube, 16 inches along each axis, and a 16 bottle capacity. This module is the fundamental organizing concept of Wine Cube.
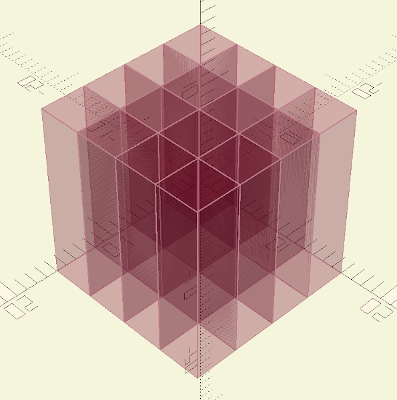
This organizational concept means that the standard shelf depth of vertically oriented bottles is 4 bottles, which is an ideal depth for a wine bottle shelf at any height. And because the organization is a cube, it is fundamentally agnostic about bottle orientation, even allowing the possibility of mixing orientations. This standardized module also supports a variety of shelving configurations, although the system is named partly for the cube configuration, the configuration that best optimizes an open space. Notice too that given an uninterrupted sequence of whole bottle cubes, the length of a shelf in inches is equal to the shelf’s bottle capacity.
This simple model encapsulates the fundamental constraints of Wine Cube.
Why I Chose OpenSCAD
One of my goals with this project was to use it as a way to learn CAD.
I originally set out to use FreeCAD, however, soon became frustrated, as I realized I was spending most of my time learning, and fighting with, its user interface instead of learning CAD itself and building my project. The structure I was imagining was based on specific mathematical relationships, and what I wanted to do was directly describe what those relationships were and then construct the object accordingly, similar to how I have worked in the past in a general programming language such as Javascript to create SVG images. Instead of learning to satisfy the user interface, I just wanted to directly and accurately describe the structure itself.
My misgivings were further solidified when working with constraints, which seemed to only partially solve the problem, as often rules were boiled down to simple tests and outcomes, and these still had to be manually specified within an arbitrary user interface. I wanted my structure to be built from mathematical relationships, so the constraints would be implicitly enforced as part of unambiguously interpreting and building the structure I wanted to describe. To be fair, FreeCAD’s user interface is probably very well designed for its purpose and not more difficult to use than competing software, and I believe FreeCAD offers at least some scripting capabilities, but I wanted something with a fundamentally different approach. My issues were not with FreeCAD per se, but with the inconvenience of graphical interfaces in general.
So, I began searching for a code-oriented CAD alternative and found several possibilities, but the one I quickly settled on was OpenSCAD.
OpenSCAD is a long-lived, robust, and well supported open source project that offered exactly the solution I was looking for. Its programming syntax is very C-like and along with its straightforward API for creating geometric forms, I only needed a few moments to read a few of the many code examples supplied, and I was quickly writing significant amounts of code and seeing immediate results. I was also able to work within my normal development environment, vi, (nvim) and use all its conveniences. Additionally, OpenSCAD has a live preview feature along with a real-time console for debugging purposes, and this instant feedback allowed me to very quickly build the structure with code that was demonstrably correct.
(This ability to code with a live preview and console is similar to how Hugo based websites are built using LiveReload. For an approach I have used for developing static websites without Hugo, see Streamlining Static Web Development).
Using OpenSCAD, I finally started making significant progress on my project, and I was also more naturally learning CAD in the process, exactly as I had hoped.
Related
cell: minimal geometric font. This blog post describes the font used in the Wine Cube logo.